No blocking or sewing to report, and the spider scarf is still my only active yarny WIP.
I worked up to row 156, then had to decide whether or not to swap up to a larger size of needle (as indicated in the pattern).
The problem (as you may recall from the previous post) is that the pattern is written for laceweight. You start with four strands of yarn and gradually work your way down to fewer and fewer strands-- and larger and larger needles. (You also gradually end up with fewer stitches per row.)
I'm using a single strand of worsted weight throughout and had intended to stick with the same size needle for the whole thing, but started questioning that plan (which was based on something I read in someone's project notes, I think). Maybe it's better to increase the needle size, after all-- if not as drastically as in the pattern, at least slightly.
In the end, I decided to put in a lifeline for the last row before the first needle swap. If going up a couple of needle sizes doesn't seem to be working out, it'll be much easier to rip back with a lifeline in place. Otherwise, there is almost guaranteed to be much gnashing of teeth-- and a dog or two will probably be running for cover.
(Luna is particularly bad about that. If I so much as sigh loudly, she slinks away from me and skulks under Donald's desk. To see the way she acts, you'd think I was in the habit of mistreating her in my grumpier moods! I do naaaaaht! (Oh hi, Mark! --Warning: There's one very slight curse word in that video link, just in case there are impressionable young ears in the room...) ...Anyway, she's just very sensitive to aggravation-- mine in particular, though she behaves in a similar way if Trixie happens to sneeze. (g))
To return to topic...
Here are a couple of quick photos I snapped a couple of days ago. It's only a few rows further along, now.

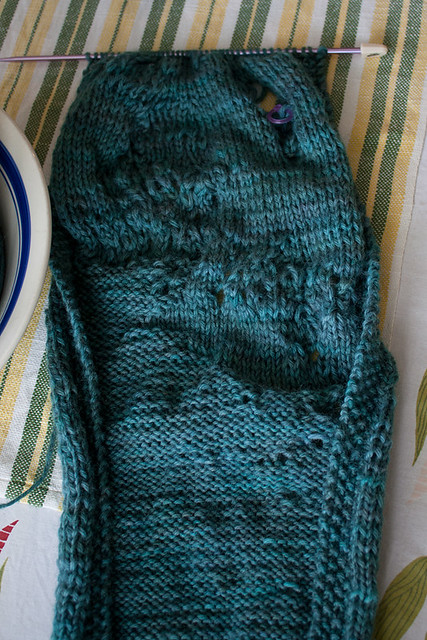
The seed stitch edging has a definite tendency to flip inward, obscuring the spider design. I've seen at least one person complain that it did so even after blocking, so that's something to look forward to dealing with... ;o)
Speaking of blocking, I hope that washing and gentle stretching will diminish some of the very visible "rowing out". It's funny: I never really worried about "rowing out" until I happened to read about it some place where it was clearly labeled a knitting problem. It's really only an aesthetic issue, and I'm not seriously bothered by it, but knowing that it's not supposed to look that way doesn't increase my satisfaction with my knitting. (Whine whine whine!)
Another aspect I'm not completely satisfied with is the cinch at the spider's "waist". It doesn't cinch enough, because I made it too loose. (I've since read a suggestion that might've improved it. Instead of clustering 5 on row 31, you cluster 2, cluster 1, cluster 2. If I were ever to make this again, I'd give that a try.) As it is, I'll try to adjust the yarn during blocking to tighten the cinch. If that doesn't help, I might just put a little knot (or two) in the back to hold it tighter.
To anyone thinking of knitting this:
The spider section looks intimidating, but just take it line by line. The spider section is entertaining; you watch it emerge one row at a time and it's fairly easy to see if what you've done is right. There's also a high degree of symmetry in the spider portion, which makes it easier to predict.
The rest of the scarf, which looks so random, is actually more difficult, for me. It's less predictable, and some of the rows have long instructions that can be tricky to keep track of. Just take it slowly. Keep careful track of which row you're on. (Ask me why!) If it helps, you can even tick off each element of a line as you complete it. If in doubt, stop and check the row you've knitted against the pattern. It's easy to get thrown off by some of the stitch patterns that repeat within the same row. More than once, I've had to tink back to the previous row to get things straight in my head, and once I just fudged it when my stitch count was off by one. Do what works for you. One good thing about this pattern is that there's plenty of room for deviation and fudging! No-one will be any the wiser.
There are a fair number of small errors in the pattern. (As of this writing, they still haven't been corrected in the pattern.) I highly recommend going to the (no longer very active) knit-along Ravelry group mentioned on the pattern page. There's a thread for corrections that is very helpful-- and it's also worth browsing some of the project notes marked as "helpful".
Before you drop a stitch (intentionally, according to the pattern), take just a second to look down your work. If there's a YO in the same column, further down, that's where the "run" will stop. (This may seem like common knowledge, but not necessarily so for us relatively inexperienced knitters...) If you don't see a YO below, you're probably either in the wrong column-- or you may have made a slight mistake in an earlier row. You can still drop the stitch, of course, if you want to. Either let it run (knowing that in theory it could run all the way to the bottom of the scarf, if nothing in the pattern stops it) or do a "controlled drop" and hold it temporarily in place with a safety pin, lockable stitch marker, or scrap of yarn tied through the stitch. Later on, you can tack it in place to keep it from running further down the scarf.
Another suggestion for anyone else making this:
Rather than fiddling with the special twisted stitches (right twist, left twist, purl right twist, purl left twist), I've read that you can treat them like tiny cables. Apparently the results look very similar, if not identical, and I found them much easier to work that way (though that may be mainly because I already had some experience with cabling without a cable needle).
If you choose to try this method, here's how I understand the process to work:
RT (Right Twist)
Briefly: hold slipped stitch to the back (and knit both)
Detailed version:
Skip first stitch. Slip needle into front of second stitch (as if to purl) and slide it off the left-hand needle. The first stitch will also slide off, in the process. Holding the right-hand needle to the front, pick up the loose stitch (the first stitch) with the left-hand needle. Slide the slipped stitch back onto the left-hand needle. (At this point, both stitches are back on the left-hand needle, but they have changed order.) Knit each stitch to complete the "twist".
LT (Left Twist)
Briefly: hold slipped stitch to the front (and knit both)
Detailed version:
Skip first stitch. Slip needle into back of second stitch (as if to purl) and slide it off the left-hand needle. The first stitch will also slide off, in the process. Holding the right-hand needle to the back, pick up the loose stitch (the first stitch) with the left-hand needle. Slide the slipped stitch back onto the left-hand needle. (At this point, both stitches are back on the left-hand needle, but they have changed order.) Knit each stitch to complete the "twist".
PRT (Purl Right Twist)
Briefly: hold slipped stitch to the back (and purl both)
Detailed version:
Same as for RT, but purl the two stitches at the end instead of knitting them.
PLT (Purl Left Twist)
Briefly: hold slipped stitch to the front (and purl both)
Detailed version:
Same as for RT, but purl the two stitches at the end instead of knitting them.
If you need a visual aid, here's a video (from VeryPink Knits) demonstrating the "cabling without a cable needle" technique. It looks scary, but keep in mind that with this pattern, you'll only have one stitch hanging loose-- not three. As long as you don't make any drastic movements (and don't have someone "helping" you by suddenly yanking the yarn), that live stitch won't have a chance to go anywhere before you scoop it back up again. :o)
And here's something not exactly craft-related, but since I no longer maintain a blog where this sort of thing really fits, it's either here or on the gardening blog...
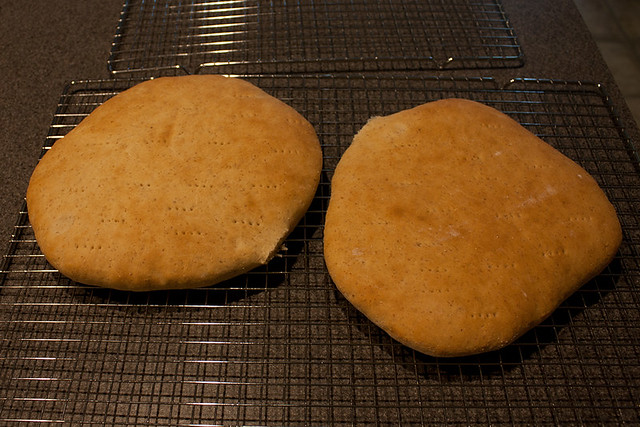
Earlier this week, I made what I think was the first yeast bread I've ever baked all by myself from scratch! This photo shows half a batch of "Swedish Round-Loaf" from my mother-in-law's recipe.
(Each loaf is maybe nine inches or so in diameter. The loaves are cut into wedges-- usually six per loaf-- then sliced to make room for cheese or anything else you like. Lunch meat, veggies, sprouts, etc.)
Yeast bread is no big deal for a lot of people, I know, but for some of us (those not caught up in the recent trend of rediscovering the art and science of bread-making), it's still intimidating.
When I was growing up, my mother made two kinds of "from-scratch", non-dessert bread, that I can recall-- cornbread (including the occasional "Mexican"/spicy variation on cornbread) and biscuits (of a type that I guess would be called "drop biscuits").
As an adult in my own kitchen, I've always had the impression (not uncommon, particularly in recent generations) that yeast bread is more difficult and/or time-consuming than other types of homemade bread.
Based on the recipe I used (translated from the Swedish by Donald), it does take a lot longer, from start to finish, to make even these simple round loaves than it does to whip up a pan of cornbread or drop biscuits, but not that much time is spent actually handling the dough. Most of it can be spent doing other things while you wait for the dough to rise.
I don't think I'll be trying the most advanced bread recipes anytime soon, but this particular bread is still just new enough of an accomplishment to make it interesting. (How long before the novelty wears off?)
I worked up to row 156, then had to decide whether or not to swap up to a larger size of needle (as indicated in the pattern).
The problem (as you may recall from the previous post) is that the pattern is written for laceweight. You start with four strands of yarn and gradually work your way down to fewer and fewer strands-- and larger and larger needles. (You also gradually end up with fewer stitches per row.)
I'm using a single strand of worsted weight throughout and had intended to stick with the same size needle for the whole thing, but started questioning that plan (which was based on something I read in someone's project notes, I think). Maybe it's better to increase the needle size, after all-- if not as drastically as in the pattern, at least slightly.
In the end, I decided to put in a lifeline for the last row before the first needle swap. If going up a couple of needle sizes doesn't seem to be working out, it'll be much easier to rip back with a lifeline in place. Otherwise, there is almost guaranteed to be much gnashing of teeth-- and a dog or two will probably be running for cover.
(Luna is particularly bad about that. If I so much as sigh loudly, she slinks away from me and skulks under Donald's desk. To see the way she acts, you'd think I was in the habit of mistreating her in my grumpier moods! I do naaaaaht! (Oh hi, Mark! --Warning: There's one very slight curse word in that video link, just in case there are impressionable young ears in the room...) ...Anyway, she's just very sensitive to aggravation-- mine in particular, though she behaves in a similar way if Trixie happens to sneeze. (g))
To return to topic...
Here are a couple of quick photos I snapped a couple of days ago. It's only a few rows further along, now.
The seed stitch edging has a definite tendency to flip inward, obscuring the spider design. I've seen at least one person complain that it did so even after blocking, so that's something to look forward to dealing with... ;o)
Speaking of blocking, I hope that washing and gentle stretching will diminish some of the very visible "rowing out". It's funny: I never really worried about "rowing out" until I happened to read about it some place where it was clearly labeled a knitting problem. It's really only an aesthetic issue, and I'm not seriously bothered by it, but knowing that it's not supposed to look that way doesn't increase my satisfaction with my knitting. (Whine whine whine!)
Another aspect I'm not completely satisfied with is the cinch at the spider's "waist". It doesn't cinch enough, because I made it too loose. (I've since read a suggestion that might've improved it. Instead of clustering 5 on row 31, you cluster 2, cluster 1, cluster 2. If I were ever to make this again, I'd give that a try.) As it is, I'll try to adjust the yarn during blocking to tighten the cinch. If that doesn't help, I might just put a little knot (or two) in the back to hold it tighter.
To anyone thinking of knitting this:
The spider section looks intimidating, but just take it line by line. The spider section is entertaining; you watch it emerge one row at a time and it's fairly easy to see if what you've done is right. There's also a high degree of symmetry in the spider portion, which makes it easier to predict.
The rest of the scarf, which looks so random, is actually more difficult, for me. It's less predictable, and some of the rows have long instructions that can be tricky to keep track of. Just take it slowly. Keep careful track of which row you're on. (Ask me why!) If it helps, you can even tick off each element of a line as you complete it. If in doubt, stop and check the row you've knitted against the pattern. It's easy to get thrown off by some of the stitch patterns that repeat within the same row. More than once, I've had to tink back to the previous row to get things straight in my head, and once I just fudged it when my stitch count was off by one. Do what works for you. One good thing about this pattern is that there's plenty of room for deviation and fudging! No-one will be any the wiser.
There are a fair number of small errors in the pattern. (As of this writing, they still haven't been corrected in the pattern.) I highly recommend going to the (no longer very active) knit-along Ravelry group mentioned on the pattern page. There's a thread for corrections that is very helpful-- and it's also worth browsing some of the project notes marked as "helpful".
Before you drop a stitch (intentionally, according to the pattern), take just a second to look down your work. If there's a YO in the same column, further down, that's where the "run" will stop. (This may seem like common knowledge, but not necessarily so for us relatively inexperienced knitters...) If you don't see a YO below, you're probably either in the wrong column-- or you may have made a slight mistake in an earlier row. You can still drop the stitch, of course, if you want to. Either let it run (knowing that in theory it could run all the way to the bottom of the scarf, if nothing in the pattern stops it) or do a "controlled drop" and hold it temporarily in place with a safety pin, lockable stitch marker, or scrap of yarn tied through the stitch. Later on, you can tack it in place to keep it from running further down the scarf.
Another suggestion for anyone else making this:
Rather than fiddling with the special twisted stitches (right twist, left twist, purl right twist, purl left twist), I've read that you can treat them like tiny cables. Apparently the results look very similar, if not identical, and I found them much easier to work that way (though that may be mainly because I already had some experience with cabling without a cable needle).
If you choose to try this method, here's how I understand the process to work:
RT (Right Twist)
Briefly: hold slipped stitch to the back (and knit both)
Detailed version:
Skip first stitch. Slip needle into front of second stitch (as if to purl) and slide it off the left-hand needle. The first stitch will also slide off, in the process. Holding the right-hand needle to the front, pick up the loose stitch (the first stitch) with the left-hand needle. Slide the slipped stitch back onto the left-hand needle. (At this point, both stitches are back on the left-hand needle, but they have changed order.) Knit each stitch to complete the "twist".
LT (Left Twist)
Briefly: hold slipped stitch to the front (and knit both)
Detailed version:
Skip first stitch. Slip needle into back of second stitch (as if to purl) and slide it off the left-hand needle. The first stitch will also slide off, in the process. Holding the right-hand needle to the back, pick up the loose stitch (the first stitch) with the left-hand needle. Slide the slipped stitch back onto the left-hand needle. (At this point, both stitches are back on the left-hand needle, but they have changed order.) Knit each stitch to complete the "twist".
PRT (Purl Right Twist)
Briefly: hold slipped stitch to the back (and purl both)
Detailed version:
Same as for RT, but purl the two stitches at the end instead of knitting them.
PLT (Purl Left Twist)
Briefly: hold slipped stitch to the front (and purl both)
Detailed version:
Same as for RT, but purl the two stitches at the end instead of knitting them.
If you need a visual aid, here's a video (from VeryPink Knits) demonstrating the "cabling without a cable needle" technique. It looks scary, but keep in mind that with this pattern, you'll only have one stitch hanging loose-- not three. As long as you don't make any drastic movements (and don't have someone "helping" you by suddenly yanking the yarn), that live stitch won't have a chance to go anywhere before you scoop it back up again. :o)
- - - - - - -
And here's something not exactly craft-related, but since I no longer maintain a blog where this sort of thing really fits, it's either here or on the gardening blog...
Earlier this week, I made what I think was the first yeast bread I've ever baked all by myself from scratch! This photo shows half a batch of "Swedish Round-Loaf" from my mother-in-law's recipe.
(Each loaf is maybe nine inches or so in diameter. The loaves are cut into wedges-- usually six per loaf-- then sliced to make room for cheese or anything else you like. Lunch meat, veggies, sprouts, etc.)
Yeast bread is no big deal for a lot of people, I know, but for some of us (those not caught up in the recent trend of rediscovering the art and science of bread-making), it's still intimidating.
When I was growing up, my mother made two kinds of "from-scratch", non-dessert bread, that I can recall-- cornbread (including the occasional "Mexican"/spicy variation on cornbread) and biscuits (of a type that I guess would be called "drop biscuits").
As an adult in my own kitchen, I've always had the impression (not uncommon, particularly in recent generations) that yeast bread is more difficult and/or time-consuming than other types of homemade bread.
Based on the recipe I used (translated from the Swedish by Donald), it does take a lot longer, from start to finish, to make even these simple round loaves than it does to whip up a pan of cornbread or drop biscuits, but not that much time is spent actually handling the dough. Most of it can be spent doing other things while you wait for the dough to rise.
I don't think I'll be trying the most advanced bread recipes anytime soon, but this particular bread is still just new enough of an accomplishment to make it interesting. (How long before the novelty wears off?)