Back as promised with details from the dyeing!
Administer caffeine now, because this one's a rambler... (Or, you know, skim and/or skip at will.)
The goal was to dye yarn with (what I believe are usually called) long color repeats.
The key to long color repeats is to not just make one long hank of yarn by either whirling it onto the swift or wrapping it around chairs, end of a table, etc. You can do that and carefully dip or paint sections in different colors if you want short repeats, which read as blips of color in knitted or crocheted fabric.
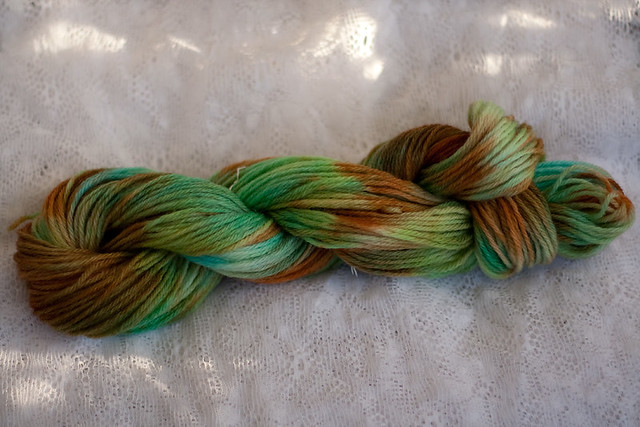
For example, I dyed this yarn with lots of splotches of color, which was lots of fun to do:
And then I knitted it into this hat, which I found disappointing:
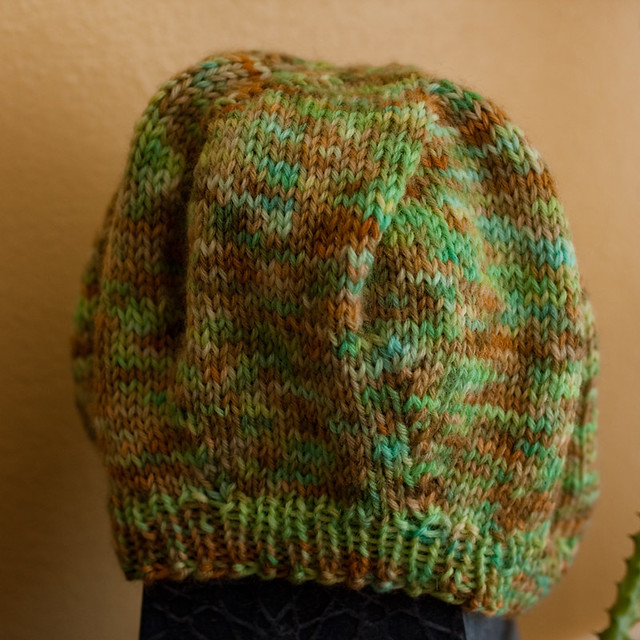
It was just too mottled for my taste.
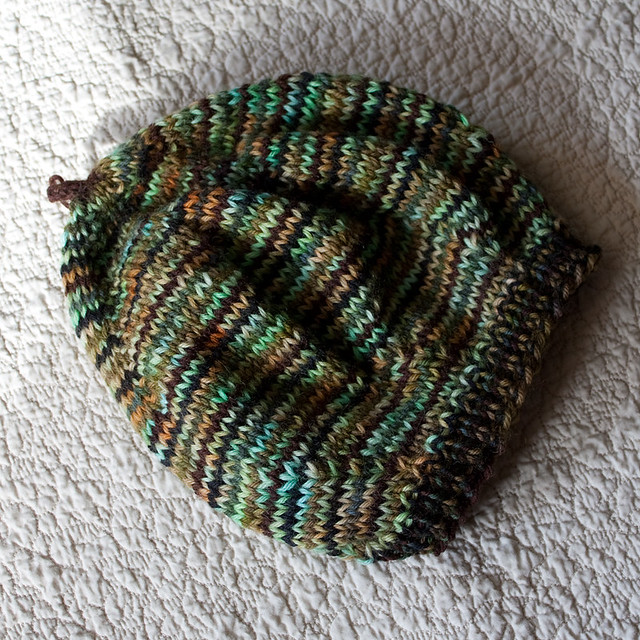
Striping it with another, darker yarn, though, yielded a result that I did like, because it broke up some of the mottling. Still, though, I think you can see what I mean by "blips of color":
Short repeats can be fine or even wonderful in certain patterns, but this time it wouldn't be quite right. This patterns calls for leisurely lengths-- not blips-- of color.
There may be an easier way than this to get long color repeats, but if so, I haven't seen or thought of it. It's a bit tedious and time-consuming, but just put on some good music or listen to a favorite movie or TV program.
What you want to do is separate the skein/ball/hank/whatever into multiple "mini-hanks"-- while leaving them attached to one another. (That part's important. You shouldn't cut the yarn into smaller sections. That just makes more work, down the road.) I used a partially opened umbrella swift to create these mini-hanks, but honestly, I'm not sure that's the best way to do it, as I suspect that the swift closed in upon itself a little bit as I wrapped the yarn... It wasn't a big deal for me, because I was varying the sizes of my mini-hanks slightly. (If you're going for precision, something that can't possibly "shrink" mid-process would be best.)
My mini-hank process worked like this:
--Wrap the yarn around the small-diameter swift a certain number of times. Make a note of this number, if you want to keep the length of the repeats fairly uniform. The more wraps, the longer the yarn will stay one color.
--Stop wrapping. Do not cut the yarn! Tie the mini-hank with figure-8 ties of scrap yarn (or scrap crochet cotton thread, if you have it). Be sure to tie sufficient number of times to prevent tangling. I recommend at least three ties per mini-hank. (See how this gets time-consuming?)
--Remove mini-hank from swift/niddy-noddy/etc. (If you have to collapse the swift, make a note of its size so that you can return it to that position. This is only really important if you want the mini-hanks to be the same diameter or are trying to maintain a consistent color repeat length.)
--If using swift, drape mini-hank over bottom of swift-- or otherwise arrange it so that the swift may turn freely, without tangling the mini-hank. (This bit was messy, but I found that hanging the hanks over the bottom folds of the swift worked pretty well.)
--Begin wrapping a new section. Tie off as before. Repeat until the end of the skein.
--When finished, you should have a series of mini-hanks attached one to the next. Each mini-hank represents one long "stripe"/repeat. You can dye each one a different color, or you can distribute them between/among two or more colors in any sequence you choose. This method of "daisy-chaining" mini-hanks can also be useful for gradient dyeing.
I turned four skeins into bunches of mini-hanks-- two skeins per colorway. (The scarf pattern requires two colorways.)
The next step was the determine the colors in each homemade colorway. I kinda-sorta took my inspiration from the yarns in Moonstitches' Rhubarb Scarf-- but I decided to do a loose interpretation, because that's a lot of colors to duplicate, and it's not easy to get copies of so many colors just right on the first try. (Translation: Lazy and impatient.)
Anyway, I planned to make one pair of skeins in mostly greens/blues, with a hint of beige and grey. For the second pair, I would aim for pinks/red-violet/rust.
This was my first time using the microwave and mason jars to dye. (Previously, I've always used old pots on the stovetop.)
I'm no expert in this process, but here's how I did it, this time:
--Pre-soak the yarn in cool water with a dash of vinegar in it. (I didn't measure the water, but I didn't use tons-- just enough to really soak the yarn and a little extra. I put one tablespoon of vinegar in each soak-bath.) You can soak yarn overnight. I ended up soaking two of the skeins for probably only a few hours, at the most, while the other two soaked for about 24 hours.
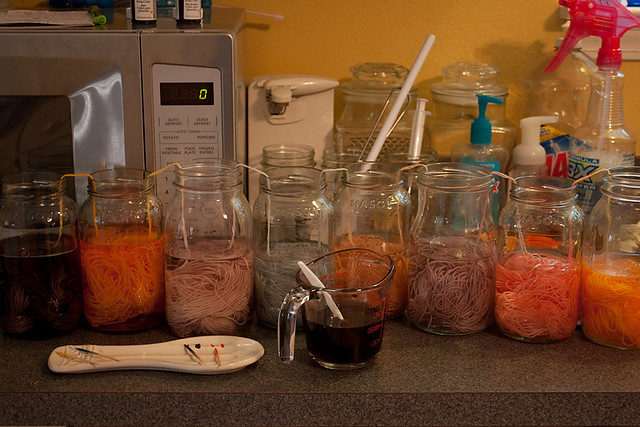
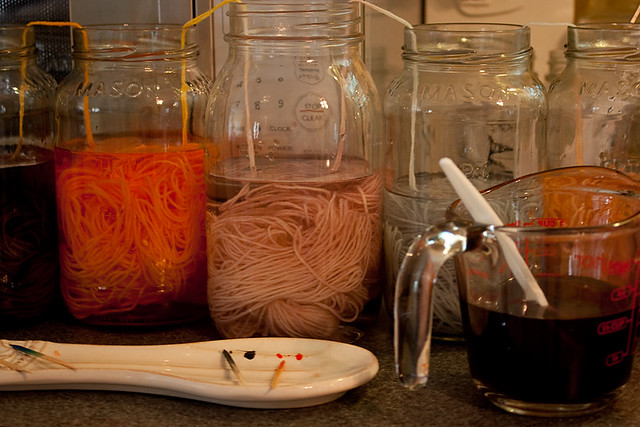
--Fill mason jars about 1/2 full of plain tap water-- or enough to cover yarn, once it's in the jars. Add small amounts of Wilton food color gel (or other food-coloring) to each jar. (I used toothpicks to scoop out the gel.) Whisk to dissolve gel as fully as possible. (Little globs can make dark speckles on the yarn-- highly unpredictable.) If you're a note-taking kind of person, you can keep a record of your color mixes. (Note: If you don't have mason jars, anything that's safe to heat in the microwave will work.)
--Arrange jars into the sequence in which you'll be using them.
--With jars still out of the microwave, squeeze most of the water out of the first mini-hank. (Since I was dyeing two re-wrapped skeins to match, I squeezed the first mini-hank of each skein.) Place the mini-hank into the first jar. (If you're doing two at a time, as I did, place them into the jar simultaneously.) Use a spoon or other utensil to fully submerge the mini-hanks.
--Continue through the entire sequence of mini-hanks.
--If the "joining strands" between the mini-hanks don't wick the dye solution, you can use a spoon, ladle, eyedropper, or syringe to dampen them. (This is purely optional. If un-dyed bits won't trouble you, don't bother.)
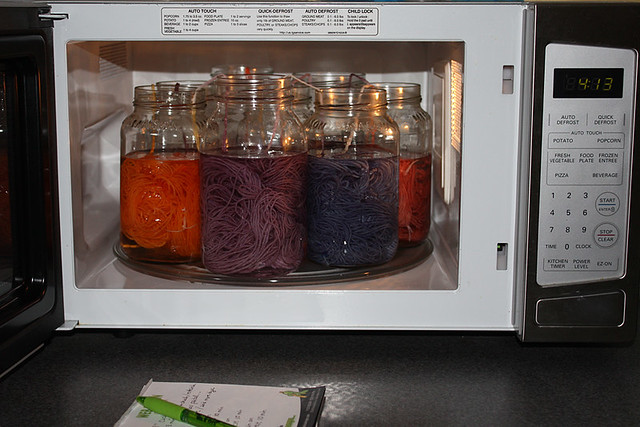
--Some people put their jars into a dish that fits in the microwave to protect it from spills. I found my jars so heavy (as a group) that I decided to just put them in one or two at a time and hope that the microwave's tempered glass turntable would be enough protection. It worked fine, but next time I might try harder to find a shallow dish that would fit all the jars. ...However you do it, put the jars into the microwave oven.
--Run microwave on high for 2-3 minutes. (Caution: Again, not an expert. Your microwave may work differently from mine... I've read that you should always be sure that all yarn in the microwave is damp to prevent scorching or fire. That shouldn't be an issue with this technique, but just in case... Even if there's a portion of yarn you want to leave undyed, be sure to dampen it with plain, untinted water.)
--Allow jars of yarn to cool for ten minutes. (No need to remove them from the microwave, at this point.)
--Run microwave for another 1-2 minutes. Cool for ten more minutes. Run through more cycles of 1-2 minutes on, 10 off until the dye-bath (the water in the jars) is clear. (I checked mine with a white plastic spoon.) To use dyeing terminology, a clear dye-bath means that the dye has "exhausted" (all attached to the yarn).
--DISCLAIMER: Did I mention that I'm not an expert? ;o) Seriously, though, if you're really interested in food-color dyeing, I recommend visiting some of the helpful websites out there and joining this Ravelry group: What a Kool Way to Dye. The process I've described seems to have worked for me, but there are variables-- how much vinegar you need, how long it takes for the dye to "set" permanently into the yarn, etc. Just because I got results that I'm satisfied with, this time, doesn't mean I did everything perfectly. For instance, some of the color in my yarn is a bit splotchy. There are a variety of potential reasons for that... It's superwash wool, which (I've read) tends to slurp up the dye quickly... Maybe I had too much vinegar in my soaking water... Maybe I needed more water or dye in the jars... Maybe the yarn was too crowded... Who knows? I'm satisfied with my results, but I tend to look at dyeing as a mad-scientist experiment. I never know exactly what my results will be, because I'm not into measuring and taking copious notes and premixing the dye and so on. I just don't want someone to ruin their really-really-nice yarn because they're following my "instructions", thinking that I can guide them to the Land of the Perfect Dye-Job. (g) Wish I could, but I'm not there yet, myself!
--So... Once the water's clear, let it sit and cool for a good long time. Just let it sit in the microwave for a while, if you like. (The jars are easier and safer to move if they're not piping hot.) The jars take a loooong time (hours) to cool completely, but you don't want to risk burning yourself or felting your newly-dyed yarn, so try to forget about it for a while. (If I'm not mistaken, letting the yarn cool this way also helps set the color into the yarn even better.)
--When the yarn is finally, finally cool, remove it from the jars, taking care to avoid tangling the mini-hanks. (I went one jar at a time, with two dishpans ready to take the yarn-- one per skein. I think that helped prevent tangles. Poured off the water, gently squeezed out most of the water, and put each mini-hank into its prescribed dishpan. Then on to the next jar, letting the "connecting strands" lead me to the next mini-hank.)
--Soak/rinse the yarn-- gently, trying to keep the mini-hanks neatly in order. (At this point, you can do whatever you normally would do for newly-dyed yarn. Some people like to soak it in a special product-- anything from a marketed yarn soak to cheap hair conditioner. Sometimes I use conditioner, but this time I didn't bother, as I'll be using the yarn soon and washing the finished object afterwards, most likely.)
--NOTE: If you notice colors "running" into the rinse/soak water, that means that your dye didn't set properly. I'd recommend researching elsewhere for tips on how to deal with that. All I can tell you is that it probably means you need more acid (vinegar, for instance) and/or a longer time at a high enough temperature. Don't panic, though. It should be pretty easy to set the dye.
--Gently squeeze water from the yarn. If you like, you can press it between the folds of a clean, dry towel to remove even more water, hastening the dry-time. Place the yarn somewhere to dry; usually hanging is best. If the weather is dry enough, you can even hang it outdoors, out of direct sunlight. Allow yarn to dry thoroughly before carefully cutting the figure-8 ties and rewinding it into either a large, single hank or a ball. (If you wind it into a hank, don't forget to tie it with a few fresh figure-8's!)
--Congratulations! Your yarn is ready to use!
So, that was my process.
Now here are some details specific to these two batches of yarn:
For the first two skeins, I used six dye-baths/jars. (All were made using Wilton food-color gels.)
1. Sky Blue
2. Leaf Green, Teal, and a dab of Royal Blue
3. Teal
4. Leaf Green
5. Brown
6. Black (new formula)
(Since these skeins were wound into seven mini-hanks each, but I mixed only six jars of color, I had intended to start and stop with the Sky Blue. However, I accidentally put the first two mini-hanks of one skein into the Sky Blue and didn't notice until near the end of the color sequence. Oops! That one got an extra-long stretch of Sky Blue at one end and none at the other.)
I ran it for four cycles through the microwave (including the first, longer burst). The last cycle was probably not strictly necessary, but "one more for good measure" seems like a good idea.
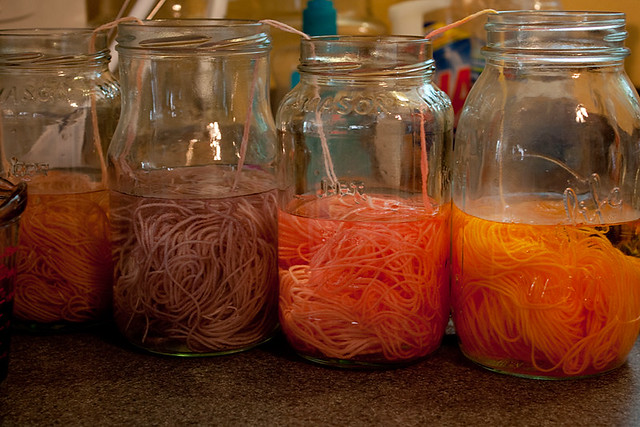
Here they are waiting to be re-hanked (re-skeined?):
(I make no claims as to the color accuracy of these photos, by the way...)
The attempt at grey turned out darker and more purple than intended, and the brown, blues, and greens warmer and more vivid than in the "inspiration yarn", but not bad. I'm not sure how the purple-grey and brown will work out in conjunction with the blues and greens-- they seem to stand out too much, right now-- but it may look nicer than expected.
. . .
For the second two skeins, I used eight dye-baths, again using only Wilton. (These skeins were divided into eight mini-hanks, so one dye-bath per section.)
I started the microwave, but after the first cycle, I gave the jars another look and determined that they were far too pastel for what I had in mind. So out they all came again. I used the rough descriptions I'd jotted down for the mixes as a guide, but also tweaked the new mixtures as I went. (In other words, no "recipes" for these colors... Not that the earlier descriptions told you much! I can tell you, in case you're interested, that almost all of them have some No-Taste Red. Purple tints have Royal Blue. The ones with a yellow cast contain Golden Yellow. At least one has Brown, and another has "new formula" Black.)
I mixed the gels into a little water in a Pyrex-style measuring cup, poured them into the jars (with the yarn still in place), and used a little plastic spoon to gently "redistribute" the new dye around the jar.
After that delightful detour ;o) it was back to business as usual. (Four cycles of microwave on, microwave off. Cooling, rinsing, squeezing, and hanging to dry.)
The second application of dye helped, but some of the colors still aren't quite as dark as I'd had in mind. I could have added even more dye, but at that point, I was satisfied (and ready to move on to something else before the whole weekend was gone).
Interestingly, the yarn ended up more orange and purple than I'd planned. When I mixed colors, I just tended toward purples more than pinks-- and I liked the two orange/tangerine colors too much to change them. I actually love the way that colorway came out, as a stand-alone. (It feels like a sunset sky!) I hope it'll work well with the blue/green colorway...
. . .
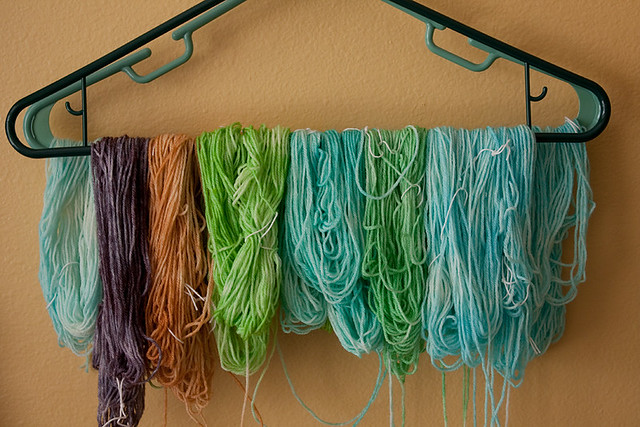
Here's all the dyed yarn together:
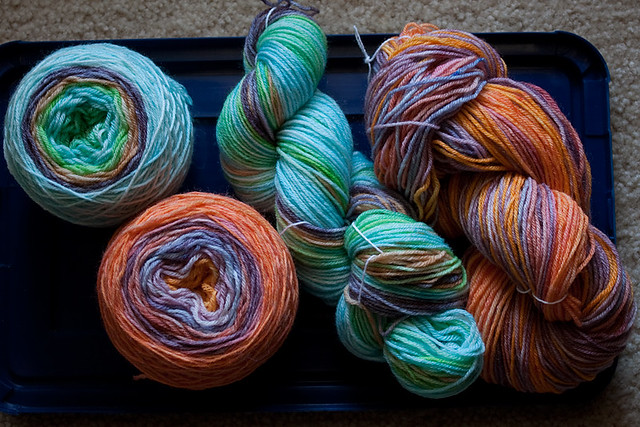
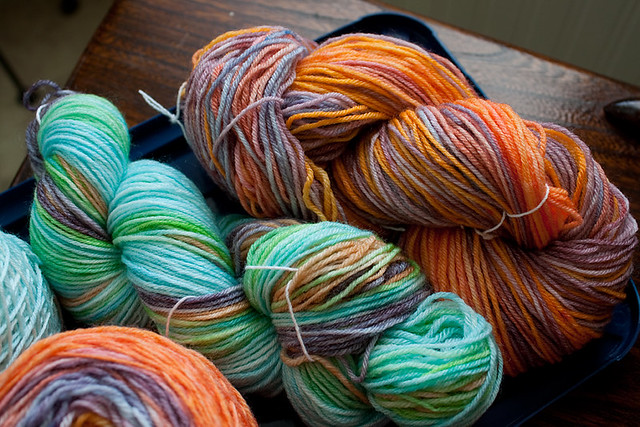
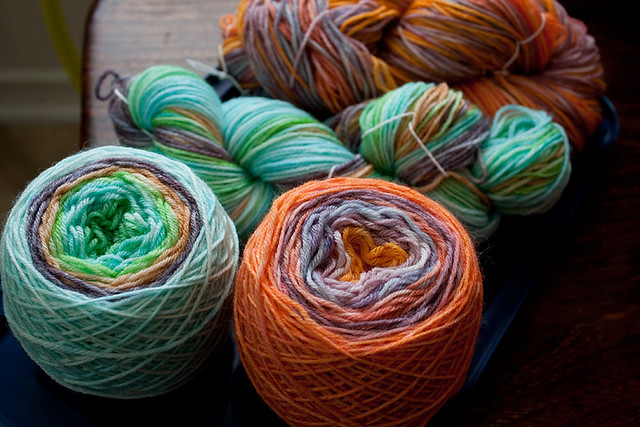
(I think these colors should be fairly accurate-- especially in the top photo.)
Administer caffeine now, because this one's a rambler... (Or, you know, skim and/or skip at will.)
- - - - - - -
The goal was to dye yarn with (what I believe are usually called) long color repeats.
The key to long color repeats is to not just make one long hank of yarn by either whirling it onto the swift or wrapping it around chairs, end of a table, etc. You can do that and carefully dip or paint sections in different colors if you want short repeats, which read as blips of color in knitted or crocheted fabric.
For example, I dyed this yarn with lots of splotches of color, which was lots of fun to do:
And then I knitted it into this hat, which I found disappointing:
It was just too mottled for my taste.
Striping it with another, darker yarn, though, yielded a result that I did like, because it broke up some of the mottling. Still, though, I think you can see what I mean by "blips of color":
Short repeats can be fine or even wonderful in certain patterns, but this time it wouldn't be quite right. This patterns calls for leisurely lengths-- not blips-- of color.
There may be an easier way than this to get long color repeats, but if so, I haven't seen or thought of it. It's a bit tedious and time-consuming, but just put on some good music or listen to a favorite movie or TV program.
What you want to do is separate the skein/ball/hank/whatever into multiple "mini-hanks"-- while leaving them attached to one another. (That part's important. You shouldn't cut the yarn into smaller sections. That just makes more work, down the road.) I used a partially opened umbrella swift to create these mini-hanks, but honestly, I'm not sure that's the best way to do it, as I suspect that the swift closed in upon itself a little bit as I wrapped the yarn... It wasn't a big deal for me, because I was varying the sizes of my mini-hanks slightly. (If you're going for precision, something that can't possibly "shrink" mid-process would be best.)
- - - - - - -
My mini-hank process worked like this:
--Wrap the yarn around the small-diameter swift a certain number of times. Make a note of this number, if you want to keep the length of the repeats fairly uniform. The more wraps, the longer the yarn will stay one color.
--Stop wrapping. Do not cut the yarn! Tie the mini-hank with figure-8 ties of scrap yarn (or scrap crochet cotton thread, if you have it). Be sure to tie sufficient number of times to prevent tangling. I recommend at least three ties per mini-hank. (See how this gets time-consuming?)
--Remove mini-hank from swift/niddy-noddy/etc. (If you have to collapse the swift, make a note of its size so that you can return it to that position. This is only really important if you want the mini-hanks to be the same diameter or are trying to maintain a consistent color repeat length.)
--If using swift, drape mini-hank over bottom of swift-- or otherwise arrange it so that the swift may turn freely, without tangling the mini-hank. (This bit was messy, but I found that hanging the hanks over the bottom folds of the swift worked pretty well.)
--Begin wrapping a new section. Tie off as before. Repeat until the end of the skein.
--When finished, you should have a series of mini-hanks attached one to the next. Each mini-hank represents one long "stripe"/repeat. You can dye each one a different color, or you can distribute them between/among two or more colors in any sequence you choose. This method of "daisy-chaining" mini-hanks can also be useful for gradient dyeing.
- - - - - - -
I turned four skeins into bunches of mini-hanks-- two skeins per colorway. (The scarf pattern requires two colorways.)
The next step was the determine the colors in each homemade colorway. I kinda-sorta took my inspiration from the yarns in Moonstitches' Rhubarb Scarf-- but I decided to do a loose interpretation, because that's a lot of colors to duplicate, and it's not easy to get copies of so many colors just right on the first try. (Translation: Lazy and impatient.)
Anyway, I planned to make one pair of skeins in mostly greens/blues, with a hint of beige and grey. For the second pair, I would aim for pinks/red-violet/rust.
This was my first time using the microwave and mason jars to dye. (Previously, I've always used old pots on the stovetop.)
- - - - - - -
I'm no expert in this process, but here's how I did it, this time:
--Pre-soak the yarn in cool water with a dash of vinegar in it. (I didn't measure the water, but I didn't use tons-- just enough to really soak the yarn and a little extra. I put one tablespoon of vinegar in each soak-bath.) You can soak yarn overnight. I ended up soaking two of the skeins for probably only a few hours, at the most, while the other two soaked for about 24 hours.
--Fill mason jars about 1/2 full of plain tap water-- or enough to cover yarn, once it's in the jars. Add small amounts of Wilton food color gel (or other food-coloring) to each jar. (I used toothpicks to scoop out the gel.) Whisk to dissolve gel as fully as possible. (Little globs can make dark speckles on the yarn-- highly unpredictable.) If you're a note-taking kind of person, you can keep a record of your color mixes. (Note: If you don't have mason jars, anything that's safe to heat in the microwave will work.)
--Arrange jars into the sequence in which you'll be using them.
--With jars still out of the microwave, squeeze most of the water out of the first mini-hank. (Since I was dyeing two re-wrapped skeins to match, I squeezed the first mini-hank of each skein.) Place the mini-hank into the first jar. (If you're doing two at a time, as I did, place them into the jar simultaneously.) Use a spoon or other utensil to fully submerge the mini-hanks.
--Continue through the entire sequence of mini-hanks.
--If the "joining strands" between the mini-hanks don't wick the dye solution, you can use a spoon, ladle, eyedropper, or syringe to dampen them. (This is purely optional. If un-dyed bits won't trouble you, don't bother.)
--Some people put their jars into a dish that fits in the microwave to protect it from spills. I found my jars so heavy (as a group) that I decided to just put them in one or two at a time and hope that the microwave's tempered glass turntable would be enough protection. It worked fine, but next time I might try harder to find a shallow dish that would fit all the jars. ...However you do it, put the jars into the microwave oven.
--Run microwave on high for 2-3 minutes. (Caution: Again, not an expert. Your microwave may work differently from mine... I've read that you should always be sure that all yarn in the microwave is damp to prevent scorching or fire. That shouldn't be an issue with this technique, but just in case... Even if there's a portion of yarn you want to leave undyed, be sure to dampen it with plain, untinted water.)
--Allow jars of yarn to cool for ten minutes. (No need to remove them from the microwave, at this point.)
--Run microwave for another 1-2 minutes. Cool for ten more minutes. Run through more cycles of 1-2 minutes on, 10 off until the dye-bath (the water in the jars) is clear. (I checked mine with a white plastic spoon.) To use dyeing terminology, a clear dye-bath means that the dye has "exhausted" (all attached to the yarn).
--DISCLAIMER: Did I mention that I'm not an expert? ;o) Seriously, though, if you're really interested in food-color dyeing, I recommend visiting some of the helpful websites out there and joining this Ravelry group: What a Kool Way to Dye. The process I've described seems to have worked for me, but there are variables-- how much vinegar you need, how long it takes for the dye to "set" permanently into the yarn, etc. Just because I got results that I'm satisfied with, this time, doesn't mean I did everything perfectly. For instance, some of the color in my yarn is a bit splotchy. There are a variety of potential reasons for that... It's superwash wool, which (I've read) tends to slurp up the dye quickly... Maybe I had too much vinegar in my soaking water... Maybe I needed more water or dye in the jars... Maybe the yarn was too crowded... Who knows? I'm satisfied with my results, but I tend to look at dyeing as a mad-scientist experiment. I never know exactly what my results will be, because I'm not into measuring and taking copious notes and premixing the dye and so on. I just don't want someone to ruin their really-really-nice yarn because they're following my "instructions", thinking that I can guide them to the Land of the Perfect Dye-Job. (g) Wish I could, but I'm not there yet, myself!
--So... Once the water's clear, let it sit and cool for a good long time. Just let it sit in the microwave for a while, if you like. (The jars are easier and safer to move if they're not piping hot.) The jars take a loooong time (hours) to cool completely, but you don't want to risk burning yourself or felting your newly-dyed yarn, so try to forget about it for a while. (If I'm not mistaken, letting the yarn cool this way also helps set the color into the yarn even better.)
--When the yarn is finally, finally cool, remove it from the jars, taking care to avoid tangling the mini-hanks. (I went one jar at a time, with two dishpans ready to take the yarn-- one per skein. I think that helped prevent tangles. Poured off the water, gently squeezed out most of the water, and put each mini-hank into its prescribed dishpan. Then on to the next jar, letting the "connecting strands" lead me to the next mini-hank.)
--Soak/rinse the yarn-- gently, trying to keep the mini-hanks neatly in order. (At this point, you can do whatever you normally would do for newly-dyed yarn. Some people like to soak it in a special product-- anything from a marketed yarn soak to cheap hair conditioner. Sometimes I use conditioner, but this time I didn't bother, as I'll be using the yarn soon and washing the finished object afterwards, most likely.)
--NOTE: If you notice colors "running" into the rinse/soak water, that means that your dye didn't set properly. I'd recommend researching elsewhere for tips on how to deal with that. All I can tell you is that it probably means you need more acid (vinegar, for instance) and/or a longer time at a high enough temperature. Don't panic, though. It should be pretty easy to set the dye.
--Gently squeeze water from the yarn. If you like, you can press it between the folds of a clean, dry towel to remove even more water, hastening the dry-time. Place the yarn somewhere to dry; usually hanging is best. If the weather is dry enough, you can even hang it outdoors, out of direct sunlight. Allow yarn to dry thoroughly before carefully cutting the figure-8 ties and rewinding it into either a large, single hank or a ball. (If you wind it into a hank, don't forget to tie it with a few fresh figure-8's!)
--Congratulations! Your yarn is ready to use!
- - - - - - -
So, that was my process.
Now here are some details specific to these two batches of yarn:
For the first two skeins, I used six dye-baths/jars. (All were made using Wilton food-color gels.)
1. Sky Blue
2. Leaf Green, Teal, and a dab of Royal Blue
3. Teal
4. Leaf Green
5. Brown
6. Black (new formula)
(Since these skeins were wound into seven mini-hanks each, but I mixed only six jars of color, I had intended to start and stop with the Sky Blue. However, I accidentally put the first two mini-hanks of one skein into the Sky Blue and didn't notice until near the end of the color sequence. Oops! That one got an extra-long stretch of Sky Blue at one end and none at the other.)
I ran it for four cycles through the microwave (including the first, longer burst). The last cycle was probably not strictly necessary, but "one more for good measure" seems like a good idea.
Here they are waiting to be re-hanked (re-skeined?):
(I make no claims as to the color accuracy of these photos, by the way...)
The attempt at grey turned out darker and more purple than intended, and the brown, blues, and greens warmer and more vivid than in the "inspiration yarn", but not bad. I'm not sure how the purple-grey and brown will work out in conjunction with the blues and greens-- they seem to stand out too much, right now-- but it may look nicer than expected.
. . .
For the second two skeins, I used eight dye-baths, again using only Wilton. (These skeins were divided into eight mini-hanks, so one dye-bath per section.)
I started the microwave, but after the first cycle, I gave the jars another look and determined that they were far too pastel for what I had in mind. So out they all came again. I used the rough descriptions I'd jotted down for the mixes as a guide, but also tweaked the new mixtures as I went. (In other words, no "recipes" for these colors... Not that the earlier descriptions told you much! I can tell you, in case you're interested, that almost all of them have some No-Taste Red. Purple tints have Royal Blue. The ones with a yellow cast contain Golden Yellow. At least one has Brown, and another has "new formula" Black.)
I mixed the gels into a little water in a Pyrex-style measuring cup, poured them into the jars (with the yarn still in place), and used a little plastic spoon to gently "redistribute" the new dye around the jar.
After that delightful detour ;o) it was back to business as usual. (Four cycles of microwave on, microwave off. Cooling, rinsing, squeezing, and hanging to dry.)
The second application of dye helped, but some of the colors still aren't quite as dark as I'd had in mind. I could have added even more dye, but at that point, I was satisfied (and ready to move on to something else before the whole weekend was gone).
Interestingly, the yarn ended up more orange and purple than I'd planned. When I mixed colors, I just tended toward purples more than pinks-- and I liked the two orange/tangerine colors too much to change them. I actually love the way that colorway came out, as a stand-alone. (It feels like a sunset sky!) I hope it'll work well with the blue/green colorway...
. . .
Here's all the dyed yarn together:
(I think these colors should be fairly accurate-- especially in the top photo.)
- - - - - - -
Whew! As much fun as it is to dye yarn, this was still a very time-consuming project with several steps. (Winding the yarn from the mini-hanks onto the swift! That alone took far longer than expected.) This is definitely a labor of love. ;o) It would be far, far easier to just buy some yarn already dyed.
Next comes reading through the pattern, checking out some of the project notes on Ravelry that have been marked "helpful", and deciding exactly how to begin. (Which balls to start with, from the inside or outside of each, which hook to use, etc.) I feel a tendency toward procrastination coming on...
I should have a totally unrelated FO to share tomorrow. :o)