I decided that I was no longer interested in finishing a "Granny's Daughter" afghan. You need so many of those tiny, one-round grannies, and I shuddered at the thought of weaving so many ends into such miniscule pieces... The ratio of crochet-time to weaving-time left something to be desired.
So, there I was with 170 micro-granny squares. What do to with them? Make a cushion cover or bed-runner in strips, in the style of the Granny's Daughter afghan? Use them as granny square "seeds"-- just add more rounds to them? Join them "as is" to make a small cushion cover?
I'm sure there are even more possibilities, but what I settled on was to give them a second granny-round-- all in white to unify the range of colors-- and make a couple of cushion covers. (To have enough micro-grannies for two cushion covers, I had to whip up 26 more, but it was do-able. Much more do-able than drudging through another 600+ of them.)
However, instead of just adding a round of white to each and joining them afterwards-- or even working employing a typical JAYGO (join-as-you-go) method (which is what I used when I made my last hexagon-motif afghan, for instance)-- I opted for a new-to-me technique known as "continuous join".
In the continuous join method, you don't have to cut the yarn between motifs. Theoretically (if you use only one ball of yarn for the whole blanket/pillow panel), you will have only two ends to weave in, when you're done! (Of course, this assumes that you've already weaved in the ends of the individual motifs. Which I have! Yay! (g))
I was a little intimidated by continuous join (especially because I haven't seen a tutorial on how to use it to join one-round squares), but once you get started, it's not at all difficult. (It goes really quickly, too!)
Still, here are a few tips based on my experience with this technique, so far:
1. Make sure you have plenty of the joining yarn in the same color/dye lot. (If you don't have enough, the change between dye lots might stand out, and unlike some other joining methods, you won't be able to ease multiple shades together through creative placement.)
2. If you think it'll help, print or sketch out a little diagram to remind you of the directions you need to go. Once you've joined a couple rounds of motifs, it's easier to remember, but that first bit can be confusing.
3. You might want to lay out your motifs beforehand to assure a pleasing arrangement. (I didn't bother to lay out the whole pillow prior to starting, but before I began each new row, I laid down my work and selected the pieces for the row to come. It allowed for just enough control over color placement, and it also let me crochet fairly quickly, with minimal setting down/picking up.)
4. Stop to look at your work regularly. If you make a mistake-- and it's easy to do if your mind wanders-- you want to catch it before you've completed two more rows. Each square builds upon the last, so there's the potential for a lot of frogging.
If you'd like to learn more about the continuous join method, I found Crochet Cabana's Continuous JAYG demo (with charts and videos) helpful.
Here's a photo of one 7x7 micro-turned-mini-granny panel (one side of a cushion cover):
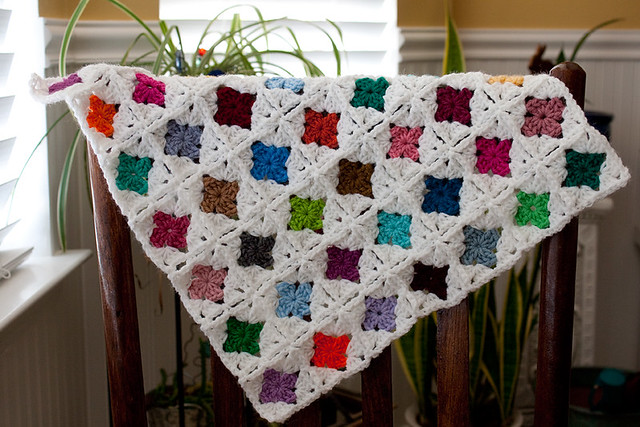
I like it! :o)
So, there I was with 170 micro-granny squares. What do to with them? Make a cushion cover or bed-runner in strips, in the style of the Granny's Daughter afghan? Use them as granny square "seeds"-- just add more rounds to them? Join them "as is" to make a small cushion cover?
I'm sure there are even more possibilities, but what I settled on was to give them a second granny-round-- all in white to unify the range of colors-- and make a couple of cushion covers. (To have enough micro-grannies for two cushion covers, I had to whip up 26 more, but it was do-able. Much more do-able than drudging through another 600+ of them.)
However, instead of just adding a round of white to each and joining them afterwards-- or even working employing a typical JAYGO (join-as-you-go) method (which is what I used when I made my last hexagon-motif afghan, for instance)-- I opted for a new-to-me technique known as "continuous join".
In the continuous join method, you don't have to cut the yarn between motifs. Theoretically (if you use only one ball of yarn for the whole blanket/pillow panel), you will have only two ends to weave in, when you're done! (Of course, this assumes that you've already weaved in the ends of the individual motifs. Which I have! Yay! (g))
I was a little intimidated by continuous join (especially because I haven't seen a tutorial on how to use it to join one-round squares), but once you get started, it's not at all difficult. (It goes really quickly, too!)
Still, here are a few tips based on my experience with this technique, so far:
1. Make sure you have plenty of the joining yarn in the same color/dye lot. (If you don't have enough, the change between dye lots might stand out, and unlike some other joining methods, you won't be able to ease multiple shades together through creative placement.)
2. If you think it'll help, print or sketch out a little diagram to remind you of the directions you need to go. Once you've joined a couple rounds of motifs, it's easier to remember, but that first bit can be confusing.
3. You might want to lay out your motifs beforehand to assure a pleasing arrangement. (I didn't bother to lay out the whole pillow prior to starting, but before I began each new row, I laid down my work and selected the pieces for the row to come. It allowed for just enough control over color placement, and it also let me crochet fairly quickly, with minimal setting down/picking up.)
4. Stop to look at your work regularly. If you make a mistake-- and it's easy to do if your mind wanders-- you want to catch it before you've completed two more rows. Each square builds upon the last, so there's the potential for a lot of frogging.
If you'd like to learn more about the continuous join method, I found Crochet Cabana's Continuous JAYG demo (with charts and videos) helpful.
Here's a photo of one 7x7 micro-turned-mini-granny panel (one side of a cushion cover):
I like it! :o)