I spoke too soon regarding the three completed gifts in January. I still haven't finished that last one-- haven't even touched it since before the last entry. (Oops.)
I did start my first Big Secret Project of the year, though. It's going well, so far. There's still tons to do, of course-- and I think I'm in denial about how long it will really take, because the first bits have gone so quickly.
Sneak peek:
That's all I can show for now. I don't want to risk giving the whole thing away. (I don't think the intended recipient reads this blog, but just in case...)
Yesterday, I gave in to a long temptation and decided to try dyeing some yarn.
You don't need much, and I just happened to already have everything I'd need. The only "ingredients" are animal-based yarn (in my case, I used wool) and either Kool-Aid (which comes with its own acid mixed into the powder) or food dye (Wilton's gels, liquid food color, Easter egg dye tablets) and vinegar (or lemon juice? I think) for acid.
You'll also need water, a pot, a spoon, and a stove. If you'd rather, you can use a microwave oven or crock pot instead of the stove. (There seem to be a hundred different ways to dye yarn. I chose an easy, mess-free way, this time-- stove, pot, wooden spoon, and a plastic dishpan for pre-soaking the yarn in water and vinegar.)

I had a skein of Lion Brand Fishermen's Wool and a small amount of (hand-me-down) vintage yarn that I think is Bear Brand "Wool and Shetland Wool".
I found a chair with a "wrap" of close to a yard (35" is the closest we have) and wrapped all the yarn into hanks, dividing the Fishermen's wool into thirds, which seems like a decent amount for a hat or neck-warmer. I wanted to play around with different colors, so the more hanks, the better. In the future, I may try to dye a larger amount in the same color-- enough to make a generously sized scarf or shawl, for instance. (I doubt I'll ever make a sweater... I tend to wear sweaters out quickly, so I'd rather just buy them.)

You may have noticed that the Fishermen's Wool was beige. It's the "Oatmeal" colorway. Most of the time, people seem to buy the "Natural" (a creamy white) for dyeing, but since I was using what I had on hand, Oatmeal it was! Next time, I'll probably try something in white or cream, but the Oatmeal worked fine. In fact, depending on the look you're going for, Oatmeal might be the better choice. I imagine it tones down bright dyes into more neutral, muted shades.

So, I ended up with five skeins (three of which are in the photo above)-- nearly 100 yards of the bright yellow, approximately 75 yards of the cream, and three 155-ish-yard skeins of the oatmeal.
I set about soaking and dying. I spent a while fiddling around with it, adding a little more color here and there to each pot, generally having fun, but I was surprised at how quickly it went. It really needn't take long at all to dye a few hanks of yarn.
I didn't take any photos of the dying process, but you can find plenty of information elsewhere. (I'll provide a few links I found useful, at the bottom of this post.)
Basically (for my own Swiss cheese memory's sake), I soaked the yarn in a solution of water and vinegar-- nothing precise, roughly 1 part vinegar to 3 parts water. I didn't soak for any prescribed length of time-- just 5 or 10 minutes, in some cases, maybe 20 or more for others.
On the stove, I heated water and vinegar (in the same 3:1 ratio, usually with a total of four cups of liquid) in pots (two at a time, at most) and added my food dye. I started out using just the Wilton's gels (the kind that come in tiny plastic pots with screw-on lids). I've had a set of four colors for years: Willow Green, Creamy Peach, Rose Petal, and Cornflower Blue. However, I ended up adding plain old liquid food coloring (the kind that come in tiny plastic droppers and that usually come in a set of red, yellow, green, and blue) to each batch.
Some of my Wilton gels tend to stay in clumps, so I used a wire whisk to help break up the color as the water heated. In some cases, I simply couldn't get all the globs to dissolve. The globs may leave spots of dark/vibrant color where they hit the yarn, but it wasn't a big issue for me. (I kind of like the look, actually.) When the color was dissolved and the water warmed (but not boiling), I lifted the hank of yarn with a wooden spoon, let as much water drain off as possible, and put it into the pot of dye. (This is where it's very handy to have the yarn soaking in another pot or a dishpan, so you can scoot it close to the dye bath to avoid dribbles.)
The smell of vinegar and wet wool is... interesting. It wasn't as bad as I'd feared, and I think I have a fairly sensitive nose, but then again, I have dogs in the house, so maybe my nose isn't that sensitive, after all. ;o)
You're supposed to let the yarn "cook" (but not boil) until the dye bath is clear, which means that the yarn has absorbed all the color. I was kind of winging it, but when I wasn't happy with how a color looked in the yarn, I'd mix up more color in a coffee cup (with a little water) and either spoon it over portions of the yarn or pour it straight in. I mixed dyes to get the colors I liked and just generally played around until I was happy, then took the pot off the heat to let it cool. (It's hard waiting for the yarn to cool enough to handle!)
Pointers: Try not to stir or otherwise agitate wool (or other feltable) yarn too much while it's hot. This can cause felting, which can ruin your yarn. Also, apparently you're not supposed to put wool into water that's colder than it is, because that also can cause felting. I didn't know that, and I know that I put warm yarn into cold water a time or two, last night, but I don't think I did too much damage (if any). Another thing to avoid: Don't pour or run water right over the wool. Doing so can cause-- yep, you guessed it, felting.
When the yarn is cool enough to handle, you rinse it (thoroughly) in water that's roughly the same temperature as the wool itself. My hanks all rinsed clear-- no color bleeding into the rinse water-- so I washed them (briefly and gently) and rinsed them some more. Then I held each hank above the sink, squeezed as much water as possible out of it (without wringing it, which is a no-no), and hung it in the utility room over a plastic clothes basket (in case it dripped). I made sure none of the hanks were touching, to give them as much air as possible. A few times before going to bed, I went and squeezed the bottom few inches of each hank over a small bucket. (You'd be surprised how much water those things hold onto!)
By morning, the smaller skeins were almost dry, but the larger three are still damp. I think I'll try a blow dryer and see if I can speed up the drying process.
I moved them into the hall bathroom for easy access, and it's hard to get an accurate photo of colors in that windowless room. I'll try again in daylight, when it's dry. For now, here's the best I could do:
From left to right:
1) Small amount of cream wool dyed primarily with Wilton's Cornflower Blue, but also with some liquid dye.
2) Oatmeal dyed primarily with Wilton's Cornflower Blue, but also with some liquid dye.
3) Oatmeal dyed with Wilton's Rose Petal and Creamy Peach, also with quite a bit of yellow and some red liquid dye. (Had to work to get a more yellow-orange cast. At first, the yarn was mostly beige with red on top. It wasn't what I wanted. I like this much better.)
4) Oatmeal dyed primarily with Wilton's Willow Green, but also with green and blue liquid dye to give it a little more variation and a slightly bluer cast).
5) Yellow wool dyed almost entirely with Wilton's Rose Petal and Creamy Peach, but with a dash or two of red liquid dye near the end to punch up the contrast.
It's interesting to note how different the same dye can look, depending on the base yarn. The yellow yarn is much more vibrant than the oatmeal. Meanwhile, the oatmeal with the Cornflower Blue (which is known, by the way, for being unstable and "splitting" into purple and blue and sometimes pink) has a grey-green undercast... I really like it (it reminds me of storm clouds, but I'm sure it wouldn't be everyone's cup of tea.

I can't wait until the yarn is dry enough to wind into balls (by hand, no ball winders here) and then be knit into something! How exciting!
(This is how people get addicted. The first step is knitting. Then you dabble with dying your own yarn. After a while, you realize you want to try spinning your own yarn from fleece, and before you know it, you have a flock of sheep in your back yard. (g))
Links I found useful (though some of them are more about Kool-Aid dyeing):
Handpaint Your Own Yarn (on Knitty)
http://knitty.com/ISSUEspring07/FEATdyeyourown.html
Wilton Dyes Tests (on InsanKnitty)
http://insanknitty.wordpress.com/2009/03/02/i-said-it-was-an-addiction-didnt-i/
Wilton Dye Ratios (on Craftster)
http://www.craftster.org/forum/index.php?topic=102434.0
Kool-Aid Dyeing (on Knitty)
http://knitty.com/ISSUEfall02/FEATdyedwool.html
Tie-Dye with Kool-Aid (by Paula Burch)
http://www.pburch.net/dyeing/FAQ/drinkmix.shtml
I also find it very interesting and inspiring to browse the hand-dyed stash of Lion Brand Fishermen's Wool on Ravelry. There are so many different looks you can achieve with just a handful of food dyes and Kool-Aid mixes! I warn you, though, if you go there and look, you most likely will feel an irresistible urge to try dying some of your own.
I did start my first Big Secret Project of the year, though. It's going well, so far. There's still tons to do, of course-- and I think I'm in denial about how long it will really take, because the first bits have gone so quickly.
Sneak peek:
That's all I can show for now. I don't want to risk giving the whole thing away. (I don't think the intended recipient reads this blog, but just in case...)
- - - - - - -
Yesterday, I gave in to a long temptation and decided to try dyeing some yarn.
You don't need much, and I just happened to already have everything I'd need. The only "ingredients" are animal-based yarn (in my case, I used wool) and either Kool-Aid (which comes with its own acid mixed into the powder) or food dye (Wilton's gels, liquid food color, Easter egg dye tablets) and vinegar (or lemon juice? I think) for acid.
You'll also need water, a pot, a spoon, and a stove. If you'd rather, you can use a microwave oven or crock pot instead of the stove. (There seem to be a hundred different ways to dye yarn. I chose an easy, mess-free way, this time-- stove, pot, wooden spoon, and a plastic dishpan for pre-soaking the yarn in water and vinegar.)
I had a skein of Lion Brand Fishermen's Wool and a small amount of (hand-me-down) vintage yarn that I think is Bear Brand "Wool and Shetland Wool".
I found a chair with a "wrap" of close to a yard (35" is the closest we have) and wrapped all the yarn into hanks, dividing the Fishermen's wool into thirds, which seems like a decent amount for a hat or neck-warmer. I wanted to play around with different colors, so the more hanks, the better. In the future, I may try to dye a larger amount in the same color-- enough to make a generously sized scarf or shawl, for instance. (I doubt I'll ever make a sweater... I tend to wear sweaters out quickly, so I'd rather just buy them.)
You may have noticed that the Fishermen's Wool was beige. It's the "Oatmeal" colorway. Most of the time, people seem to buy the "Natural" (a creamy white) for dyeing, but since I was using what I had on hand, Oatmeal it was! Next time, I'll probably try something in white or cream, but the Oatmeal worked fine. In fact, depending on the look you're going for, Oatmeal might be the better choice. I imagine it tones down bright dyes into more neutral, muted shades.
So, I ended up with five skeins (three of which are in the photo above)-- nearly 100 yards of the bright yellow, approximately 75 yards of the cream, and three 155-ish-yard skeins of the oatmeal.
I set about soaking and dying. I spent a while fiddling around with it, adding a little more color here and there to each pot, generally having fun, but I was surprised at how quickly it went. It really needn't take long at all to dye a few hanks of yarn.
I didn't take any photos of the dying process, but you can find plenty of information elsewhere. (I'll provide a few links I found useful, at the bottom of this post.)
Basically (for my own Swiss cheese memory's sake), I soaked the yarn in a solution of water and vinegar-- nothing precise, roughly 1 part vinegar to 3 parts water. I didn't soak for any prescribed length of time-- just 5 or 10 minutes, in some cases, maybe 20 or more for others.
On the stove, I heated water and vinegar (in the same 3:1 ratio, usually with a total of four cups of liquid) in pots (two at a time, at most) and added my food dye. I started out using just the Wilton's gels (the kind that come in tiny plastic pots with screw-on lids). I've had a set of four colors for years: Willow Green, Creamy Peach, Rose Petal, and Cornflower Blue. However, I ended up adding plain old liquid food coloring (the kind that come in tiny plastic droppers and that usually come in a set of red, yellow, green, and blue) to each batch.
Some of my Wilton gels tend to stay in clumps, so I used a wire whisk to help break up the color as the water heated. In some cases, I simply couldn't get all the globs to dissolve. The globs may leave spots of dark/vibrant color where they hit the yarn, but it wasn't a big issue for me. (I kind of like the look, actually.) When the color was dissolved and the water warmed (but not boiling), I lifted the hank of yarn with a wooden spoon, let as much water drain off as possible, and put it into the pot of dye. (This is where it's very handy to have the yarn soaking in another pot or a dishpan, so you can scoot it close to the dye bath to avoid dribbles.)
The smell of vinegar and wet wool is... interesting. It wasn't as bad as I'd feared, and I think I have a fairly sensitive nose, but then again, I have dogs in the house, so maybe my nose isn't that sensitive, after all. ;o)
You're supposed to let the yarn "cook" (but not boil) until the dye bath is clear, which means that the yarn has absorbed all the color. I was kind of winging it, but when I wasn't happy with how a color looked in the yarn, I'd mix up more color in a coffee cup (with a little water) and either spoon it over portions of the yarn or pour it straight in. I mixed dyes to get the colors I liked and just generally played around until I was happy, then took the pot off the heat to let it cool. (It's hard waiting for the yarn to cool enough to handle!)
Pointers: Try not to stir or otherwise agitate wool (or other feltable) yarn too much while it's hot. This can cause felting, which can ruin your yarn. Also, apparently you're not supposed to put wool into water that's colder than it is, because that also can cause felting. I didn't know that, and I know that I put warm yarn into cold water a time or two, last night, but I don't think I did too much damage (if any). Another thing to avoid: Don't pour or run water right over the wool. Doing so can cause-- yep, you guessed it, felting.
When the yarn is cool enough to handle, you rinse it (thoroughly) in water that's roughly the same temperature as the wool itself. My hanks all rinsed clear-- no color bleeding into the rinse water-- so I washed them (briefly and gently) and rinsed them some more. Then I held each hank above the sink, squeezed as much water as possible out of it (without wringing it, which is a no-no), and hung it in the utility room over a plastic clothes basket (in case it dripped). I made sure none of the hanks were touching, to give them as much air as possible. A few times before going to bed, I went and squeezed the bottom few inches of each hank over a small bucket. (You'd be surprised how much water those things hold onto!)
By morning, the smaller skeins were almost dry, but the larger three are still damp. I think I'll try a blow dryer and see if I can speed up the drying process.
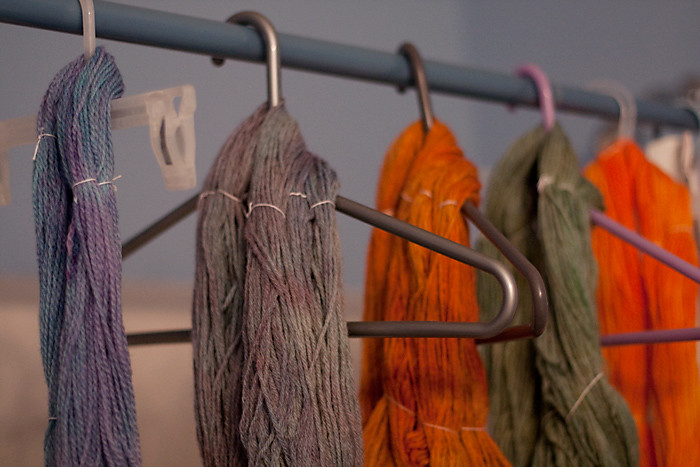
I moved them into the hall bathroom for easy access, and it's hard to get an accurate photo of colors in that windowless room. I'll try again in daylight, when it's dry. For now, here's the best I could do:
From left to right:
1) Small amount of cream wool dyed primarily with Wilton's Cornflower Blue, but also with some liquid dye.
2) Oatmeal dyed primarily with Wilton's Cornflower Blue, but also with some liquid dye.
3) Oatmeal dyed with Wilton's Rose Petal and Creamy Peach, also with quite a bit of yellow and some red liquid dye. (Had to work to get a more yellow-orange cast. At first, the yarn was mostly beige with red on top. It wasn't what I wanted. I like this much better.)
4) Oatmeal dyed primarily with Wilton's Willow Green, but also with green and blue liquid dye to give it a little more variation and a slightly bluer cast).
5) Yellow wool dyed almost entirely with Wilton's Rose Petal and Creamy Peach, but with a dash or two of red liquid dye near the end to punch up the contrast.
It's interesting to note how different the same dye can look, depending on the base yarn. The yellow yarn is much more vibrant than the oatmeal. Meanwhile, the oatmeal with the Cornflower Blue (which is known, by the way, for being unstable and "splitting" into purple and blue and sometimes pink) has a grey-green undercast... I really like it (it reminds me of storm clouds, but I'm sure it wouldn't be everyone's cup of tea.
I can't wait until the yarn is dry enough to wind into balls (by hand, no ball winders here) and then be knit into something! How exciting!
(This is how people get addicted. The first step is knitting. Then you dabble with dying your own yarn. After a while, you realize you want to try spinning your own yarn from fleece, and before you know it, you have a flock of sheep in your back yard. (g))
- - - - - - -
Links I found useful (though some of them are more about Kool-Aid dyeing):
Handpaint Your Own Yarn (on Knitty)
http://knitty.com/ISSUEspring07/FEATdyeyourown.html
Wilton Dyes Tests (on InsanKnitty)
http://insanknitty.wordpress.com/2009/03/02/i-said-it-was-an-addiction-didnt-i/
Wilton Dye Ratios (on Craftster)
http://www.craftster.org/forum/index.php?topic=102434.0
Kool-Aid Dyeing (on Knitty)
http://knitty.com/ISSUEfall02/FEATdyedwool.html
Tie-Dye with Kool-Aid (by Paula Burch)
http://www.pburch.net/dyeing/FAQ/drinkmix.shtml
I also find it very interesting and inspiring to browse the hand-dyed stash of Lion Brand Fishermen's Wool on Ravelry. There are so many different looks you can achieve with just a handful of food dyes and Kool-Aid mixes! I warn you, though, if you go there and look, you most likely will feel an irresistible urge to try dying some of your own.