You know how you hold off blogging for a while because you don't want to completely ruin the surprise of a gift? And meanwhile you accumulate quite a mental list of things to blog about? And then when the gift has been given, you find you've just kind of fallen out of the habit of blogging, and there's so much you've been meaning to write about, that the thought of blogging becomes one of those "um, maybe tomorrow / where do I start?!" things?
Yeah, well, let's see if I can ease my way back into this blog again...
The first subject to tackle is the gift that I didn't want to spoil-- the Circle of Friends baby afghan.
I was overwhelmed by the kind comments and hearts over on Ravelry for that blanket-in-progress. Wow! How flattering! It's a really fun motif, isn't it? I may make another afghan from it-- to keep this time, since I've given the first one to the mommy- and daddy-to-be. (The baby should be arriving early in May.)
So, where was I in the blanket-making process, when last I wrote? I guess I was just in the midst of making all those squares. Well, when I finally finished all I needed, I had to decide how to join them all. Because I'm not fond of sewing motifs together, I opted for the slip stitch method. This was my first time to stitch together a whole afghan's-worth of motifs, and though stitches on facing squares didn't always match as perfectly as I'd hoped (because I guess I made a mistake here and there in making them), they still all went together well enough. I don't think you can see any unevenness at all, really. (Thank goodness crochet is so forgiving!) I like the way the front of a blanket looks when the backs of the motifs are slip stitched together-- very smooth and well-finished-looking.
(If you're unfamiliar with the slip stitch joining method, I'm sure you can find information about it in lots of places online. Here's one I like: It's Lucy's (Attic24) Joining Granny Squares photo tutorial, which works just as well for squares and other motifs of the non-granny variety.)
Next up-- the border. I was tempted to try a fancy border, but in the end, I stuck with my initial plan to keep it very simple. I, um, can't remember (doh!) exactly what I did, actually... but it was either one or two rows of single crochet, then a row of reverse single crochet (crab stitch). I'm very fond of reverse single crochet for a simple, sturdy edging, and it didn't fail me this time, either.
Oh, and I used the same yarn for the joining and the border that I'd used on the last round of each motif. I thought that would tie them all together nicely. It would also have been fun, though, to use stripes of different colors on the border.
As I mentioned, I've already given the blanket, but I managed to take some photos beforehand. I'll put a handful of them here; if anyone's interested, there are more on its Ravelry project page and my Flickr photostream.)
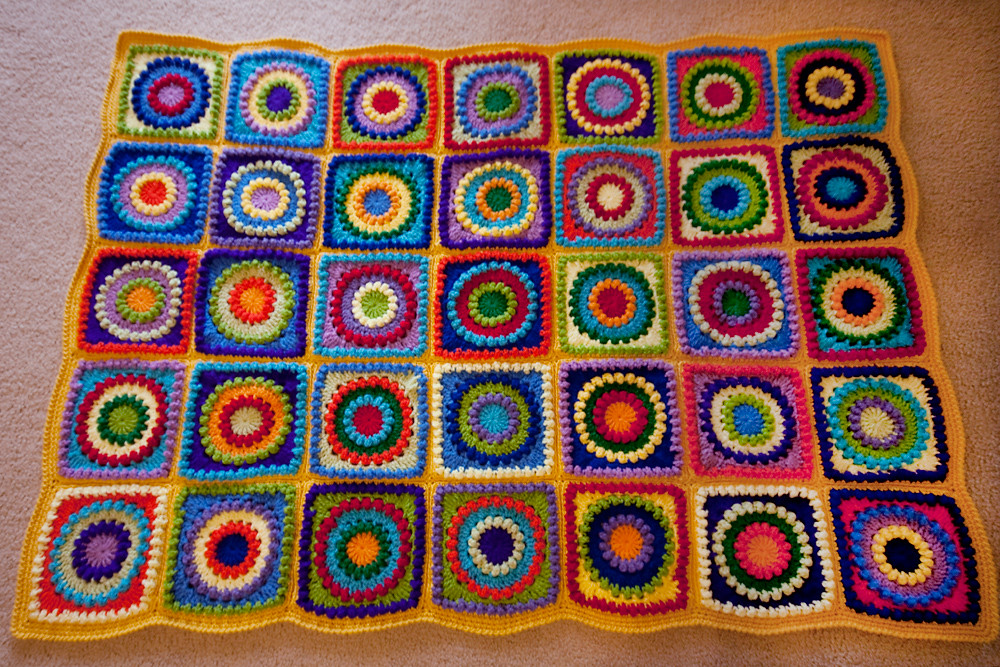
First, the whole blanket on the floor...
(None of this "pose" really turned out that well, but it gives you the basic idea, at least. All of these were taken before washing. After washing, I think the "self-blocking" aspect kicked in a bit and evened out the edges a little more.)
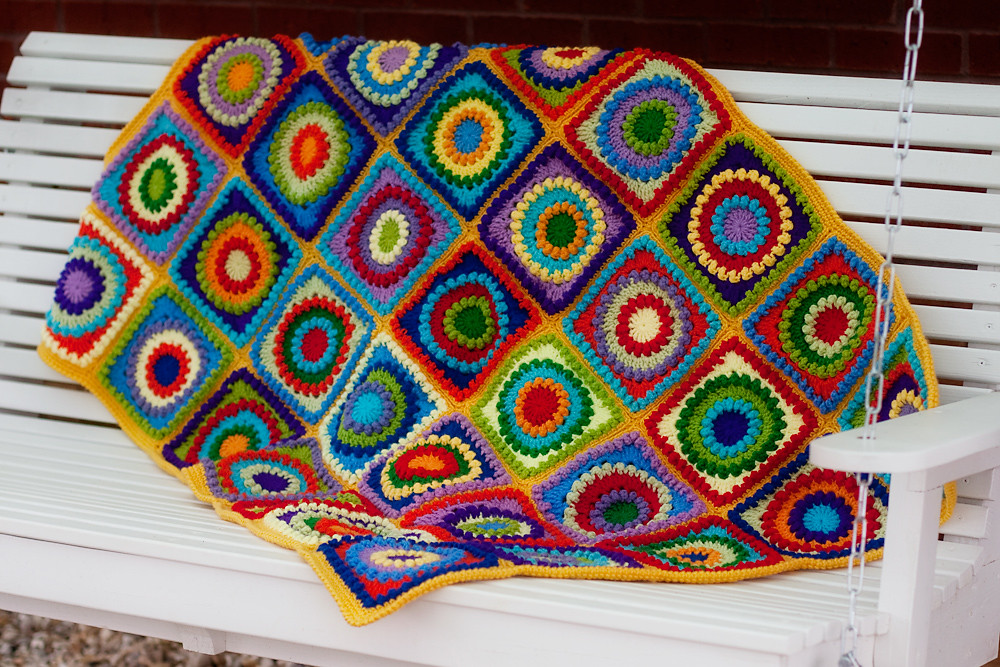
Then a couple on the swing:

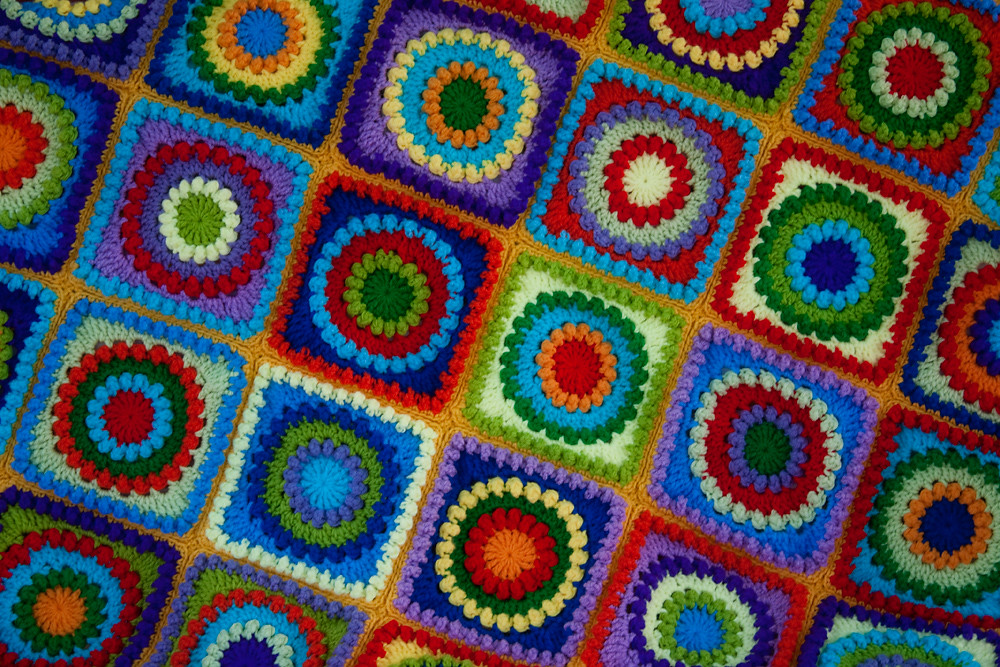
And then just a couple more...:

And that, I suppose, is that!
It was a joy to make.
Yeah, well, let's see if I can ease my way back into this blog again...
The first subject to tackle is the gift that I didn't want to spoil-- the Circle of Friends baby afghan.
I was overwhelmed by the kind comments and hearts over on Ravelry for that blanket-in-progress. Wow! How flattering! It's a really fun motif, isn't it? I may make another afghan from it-- to keep this time, since I've given the first one to the mommy- and daddy-to-be. (The baby should be arriving early in May.)
So, where was I in the blanket-making process, when last I wrote? I guess I was just in the midst of making all those squares. Well, when I finally finished all I needed, I had to decide how to join them all. Because I'm not fond of sewing motifs together, I opted for the slip stitch method. This was my first time to stitch together a whole afghan's-worth of motifs, and though stitches on facing squares didn't always match as perfectly as I'd hoped (because I guess I made a mistake here and there in making them), they still all went together well enough. I don't think you can see any unevenness at all, really. (Thank goodness crochet is so forgiving!) I like the way the front of a blanket looks when the backs of the motifs are slip stitched together-- very smooth and well-finished-looking.
(If you're unfamiliar with the slip stitch joining method, I'm sure you can find information about it in lots of places online. Here's one I like: It's Lucy's (Attic24) Joining Granny Squares photo tutorial, which works just as well for squares and other motifs of the non-granny variety.)
Next up-- the border. I was tempted to try a fancy border, but in the end, I stuck with my initial plan to keep it very simple. I, um, can't remember (doh!) exactly what I did, actually... but it was either one or two rows of single crochet, then a row of reverse single crochet (crab stitch). I'm very fond of reverse single crochet for a simple, sturdy edging, and it didn't fail me this time, either.
Oh, and I used the same yarn for the joining and the border that I'd used on the last round of each motif. I thought that would tie them all together nicely. It would also have been fun, though, to use stripes of different colors on the border.
As I mentioned, I've already given the blanket, but I managed to take some photos beforehand. I'll put a handful of them here; if anyone's interested, there are more on its Ravelry project page and my Flickr photostream.)
First, the whole blanket on the floor...
(None of this "pose" really turned out that well, but it gives you the basic idea, at least. All of these were taken before washing. After washing, I think the "self-blocking" aspect kicked in a bit and evened out the edges a little more.)
Then a couple on the swing:
And then just a couple more...:
And that, I suppose, is that!
It was a joy to make.